| Index |
 Index forum
 |
 Autentificare
 |
 Inregistrare
|
 Cine este online
 |
 Galerie imagini
|
 Calendar evenim.
 |
 Cautare detaliata
 |
 Ghid forum
 |
Colaboratori
Te intereseaza un domeniu al astronomiei si ai vrea sa scrii pentru siteul nostru? Alatura-te echipei noastre.
| Statistici forum |
| › |
Numar total de mesaje in forum: 241280 |
| › |
Numar de utilizatori inregistrati: 2930 |
| › |
Cel mai nou utilizator inregistrat: Alex Lacatos |
| › |
|
| › |
Cei mai multi utilizatori conectati au fost 1450 la data de Lun Mai 11, 2026 |
| › |
|
| › |
Actualmente sunt 0 utilizatori pe chat
|
| › |
Aceste date se bazeaza pe utilizatorii activi de peste 5 minute |
|
| Legenda |
 |
Mesaje noi |
 |
Nu sunt mesaje noi |
 |
Forumul este inchis |
|
|
| Subiectul anterior :: Subiectul urmator |
|
| Autor |
Mesaj |
Mircea Pteancu
Moderator


Data inscrierii: 12 Feb 2008
Mesaje: 10101
Motto: ''OBSERVO ERGO SUM''
Localitate: Arad
|
|
| Sus |
|
 |
Mircea Pteancu
Moderator
Data inscrierii: 12 Feb 2008
Mesaje: 10101
Motto: ''OBSERVO ERGO SUM''
Localitate: Arad
|
| Trimis: 28 Sep 2008 15:53 Download mesaj |
| Titlul subiectului: |
") |
|
|
Nu stiu daca numele lui Dick Suiter este familiar astronomilor amatori romani.Dick a scris o carte despre evaluarea telescoapelor prin observarea imaginilor de difractie ale stelelor,prima dupa mai bine de un secol de la prima,si singura pana atunci,carte scrisa de englezul Taylor (?),(iar citez din memorie).Dick Suiter a publicat in anii '80-'90 numeroase articole in ''Sky&Telescope'' si in ''Telescope Making'',majoritatea referitoare la evaluarea si optimizarea telescoapelor.Observ cu neliniste ca articolul la care fac trimitere mai jos ,si care contine zece cai de optimizare a telescoapelor Newton, nu a mai fost actualizat de 5 ani.S-a intamplat ceva cu Dick Suiter ?Sa speram numai de bine.Mircea
http://home.digitalexp.com/~suiterhr/TM/Topten.htm#02
|
|
| Sus |
|
|
Doru Dragan
Membru


Data inscrierii: 02 Mar 2006
Mesaje: 4414
Motto: PER ASPERA AD ASTRA
Localitate: Timisoara
|
| Trimis: 28 Sep 2008 18:12 Download mesaj |
| Titlul subiectului: |
| |
|
|
Willmann Bell anunta editia a doua a cartii Star Testing Astronomical Telescopes a lui Harold Richard Suiter (Dick pentru prieteni  ) pentru inceputul lui Decembrie. ) pentru inceputul lui Decembrie.
http://www.willbell.com/tm/tm5.htm
|
|
| Sus |
|
|
neox
Membru

Data inscrierii: 17 Iun 2008
Mesaje: 1553
Localitate: Iasi
|
| Trimis: 28 Sep 2008 18:29 Download mesaj |
| Titlul subiectului: |
| |
|
|
Ca venii vorba de Star testing...si pt ca vad ca e vreo 30$..iaca un tip aici pt ATMistul roman mai stramtorat: ESte un programel ( o comoara mai bine zis), de file sharing pe net, emule, unde puteti gasii tone de carti de astronomie/observatii/constructii telescoape, in format pdf. Instalati-l, si cu un seach scurt aveti o biblioteca intreaga.
http://www.emule-project.net/home/perl/general.cgi?l=38
Spor la citit
Cheers![/u]
|
|
| Sus |
|
|
Mircea Pteancu
Moderator
Data inscrierii: 12 Feb 2008
Mesaje: 10101
Motto: ''OBSERVO ERGO SUM''
Localitate: Arad
|
| Trimis: 07 Oct 2008 17:18 Download mesaj |
| Titlul subiectului: |
| |
|
|
Lipirea oglinzilor principale de reazemele barilletului a devenit o moda a ATM-ului actual.La linkul de mai jos gasiti un articol datorat lui Arjan te Marvelde si care studiaza ,fara menajamente,cazul unei oglinzi de 25 cm diametru,slefuita din placa de sticla de 19mm grosime,asezata intr-un barillet cu sase puncte de sprijin si lipita cu silicon de aceste sase puncte.Poftiti si vedeti ce se intampla:mari deformatii.Multumim Arjan pentru clarificari!
http://www.udjat.nl/atm/articles/deformation.html
Alternativa o reprezinta reazemele laterale,am dat mai sus,tot la acest topic ,un link la un soft care va ajuta in aceasta privinta.Mircea
|
|
| Sus |
|
|
Mircea Pteancu
Moderator
Data inscrierii: 12 Feb 2008
Mesaje: 10101
Motto: ''OBSERVO ERGO SUM''
Localitate: Arad
|
| Trimis: 08 Feb 2009 17:39 Download mesaj |
| Titlul subiectului: |
| |
|
|
Inca un link spre un material foarte interesant de la Mel Bartels.
http://www.bbastrodesigns.com/JoyOfMirrorM...aking.html
De retinut recomandarile lui Mel :
-la degrosare sa se foloseasca un inel metalic cu diametrul = raza oglinzii
-sa nu se foloseasca multe granulatii diferite de abrazivi ,cu granulatia redusa in trepte mici,sunt de preferat pasii mai mari
-polisari rapide si provizorii ,intre fazele de slefuire cu granulatii diferite de abrazivi , au demonstrat ca bordul rabatut nu apare la slefuire ,asadar este generat la polisare
-solutia de combatere a bordului rabatut consta in folosirea unui polisor supra-diametral,Mel recomanda un raport de 6/5 ,adica polisorul sa fie cu 20% mai mare in diametru ca oglinda
-polisorul supra-diametral cu raportul de 6/5 asigura generarea ''automata'' a unei suprafete sferice
-sa se aplice microfatetarea polisorului, in loc de canalele clasice
-(pentru definirea standardelor clasice ,Mel face trimiteri la situl meu preferat ''oldham optical'').Mircea
|
|
| Sus |
|
|
Mircea Pteancu
Moderator
Data inscrierii: 12 Feb 2008
Mesaje: 10101
Motto: ''OBSERVO ERGO SUM''
Localitate: Arad
|
|
| Sus |
|
|
Mircea Pteancu
Moderator
Data inscrierii: 12 Feb 2008
Mesaje: 10101
Motto: ''OBSERVO ERGO SUM''
Localitate: Arad
|
| Trimis: 25 Apr 2011 17:19 Download mesaj |
| Titlul subiectului: |
| |
|
|
Gasiti mai jos un articol in care Nils Olof Carlson descrie un portocular Crayford simplificat,pe care el il denumeste ''elicoidal'' deoarece miscarea fina de focalizare se obtine prin rasucirea tubului portocularului in jurul axei sale.Pentru avand rapid se apasa sau se trage pur si simplu de acelasi tub.
Succes!
Mircea
.................................................................................................
A Helical Crayford Focuser
Somewhere on the web I found something called a Helical Crayford.
It looked so easy to build and as I wanted a very low profile focuser I decided to build one although these pictures show a long eyepiece tube for clarity.
The best part is that with a selection of different length tubes you can always get an eyepiece to focus irrespective of its foibles.
I was amazed how easy it was and required very few tools. I used a cheap imported drill press, hacksaw and file so it should be possible even for those with little or no fabrication skills.
Mind you I cannot see many ATM'ers falling in to that category.
The tolerances are looser and easier to set up than for a conventional crayford and far less work is required.
I scrounged a bunch of old broken 3.5" floppy drives and dismantled them to get the small bearings.
They are not always the same size so you often have to keep looking for similar sizes.
Buy stainless bearings if you can afford them as the steel ones rust over time and mar the outside of the focuser tube.
I started off by finding some thick walled aluminium tube with a 1.25" bore for the focuser tube.
This gave a dimension for the hole in the .25" aluminium plate.
I found a hole cutter/saw that would be the closest fit to this tube with some clearance available.
(vezi poza nr.1)
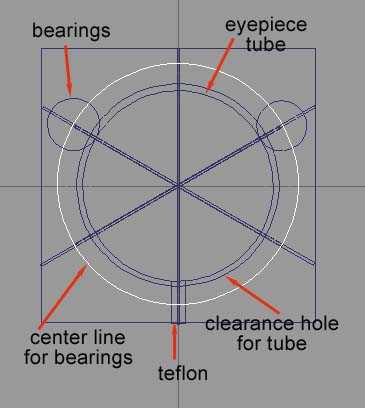
The marking out was the most difficult part of the project.
First a centre pop mark, then scribe a circle the size of the external dia of the tube, then one the outside dia of the hole cutter.
Divide the circles into 6 equal segments and scribe all 6 lines across the diameter and extend them to the edge of the plate.
The bearings need to be separated by 120 degrees with the pressure screw a further 120 degrees so choose the points that divide the circle into thirds and Lay the bearings on two of the lines so the outer edge of the bearing protrudes into the hole that the eyepiece tube will slide through.
Now scribe a circle that will fall through the middle of the bearing shaft, this is to ensure that the two bearings are equally placed around the eyepiece tube.
Drill the large hole for the eyepiece tube first whilst the table is still horizontal as there is less chance of tearing into the bearing holes this way. (don't ask me how I know)
Set the table of the drilling machine to anything from 2 - 5 degrees off horizontal.
The higher the number of degrees the greater the movement when turning. I set mine at 2.5 degrees and for me that feels fine.
Now sight up one of the lines that a bearing is on with the centre of the drill and its support shaft.
The idea is to get the center of the bearing shaft exactly on line with the center of the eyepiece tube axis then drill the two holes for the bearing shafts.
(vezi poza 2)
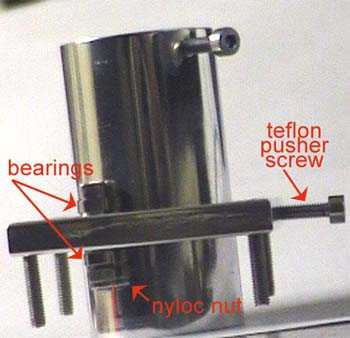
I used stainless 4mm cap screws with nylock nuts.
Depending upon how thick you can get some spacers or washers to raise the lower edge of the bearing from the flat plate
you may have to drill a shallow clearance hole for that edge of the bearing to sit into, I did it by grinding an old drill flat and forming a cutting edge so it just took a skim from around the hole deep enough for the tilt of the bearing.
Drill and tap the hole for the Teflon pressure pad.
I then cut a recess on the inside of the plate so I could use a "T" shaped piece of Teflon to give a wider surface area although I do not think its necessary.
Assemble the bearings on their shafts and through the plate using spacers so the outer ring of the bearing does not contact the plate or heads of the nuts and bolts.
Add the tube and apply pressure to the Teflon pad, twist the tube, check for sufficient clearance and if required file some off the inside of the hole.
(vezi poza 3)
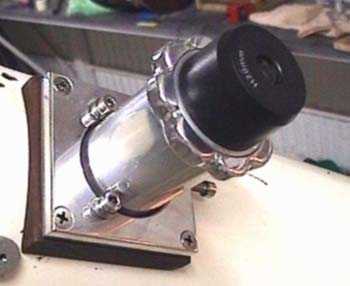
And here is the finished focuser with an extra top ring for grip.
With the polish I think it looks pretty good and more to the point it works very well and smooth. I have found that coarse adjustment can be made just by pulling or pushing with a twist for fine work.
The wooden mounting block was made by taping a sheet of sandpaper to the OTA and sanding in the curve.
Good luck.
(vezi poza 4)
If this does not make sense drop me a line and I will explain in more detail.Nils Olof Carlson
| Descriere: |
|
| Marime fisier: |
14.54 kb |
| Vizualizat: |
de 4889 ori |
|
| Descriere: |
|
| Marime fisier: |
14.77 kb |
| Vizualizat: |
de 4889 ori |
|
| Descriere: |
|
| Marime fisier: |
12.1 kb |
| Vizualizat: |
de 4889 ori |

|
| Descriere: |
|
| Marime fisier: |
11.05 kb |
| Vizualizat: |
de 4889 ori |
|
_________________
http://observoergosum.blogspot.ro/
https://astroclubgalaxis.blogspot.com
Dotare: reflectoare, lunete, cateva binocluri si un catadioptric. |
|
| Sus |
|
|
|
|
| |
Nu puteti crea un subiect nou in acest forum
Nu puteti raspunde in subiectele acestui forum
Nu puteti modifica mesajele proprii din acest forum
Nu puteti sterge mesajele proprii din acest forum
Nu puteti vota in chestionarele din acest forum
Nu puteti atasa fisiere in acest forum
Puteti descarca fisiere in acest forum
|
|


